-TIPS-
-It's always important to wet your clay every now and then to prevent it from hardening too much.
-Hollowing ceramic pieces is important & must be an even thickness at 1/2 of an inch.
- Making a venting hole in all sculptures is important as well.
-Having short nails makes it easy working with clay, I however, hate having my fingernails short so I often nick & scratch my pieces resulting me into constantly smoothing them out, trying to get rid of the marks.
-
Shape clay into something like this, basic cetacean shape, like a thick tube(noodle).

-
Shape it more for detailing.
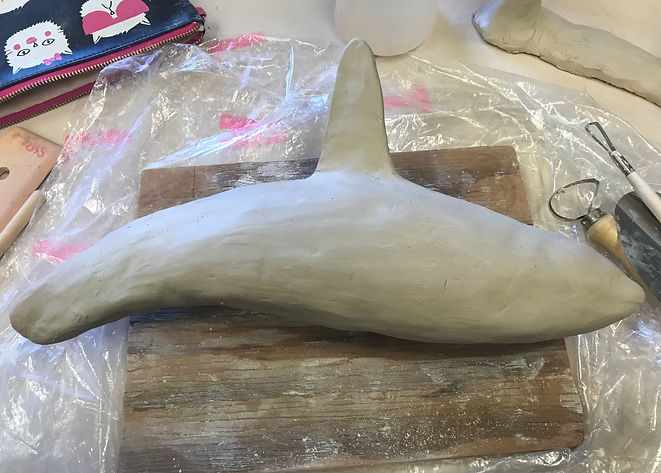
-
Add dorsal.
-
Cut in half & hollow out.
-
Shape out the fluke & pec flippers from the clay that was hollowed out.
-
Attach fluke to the end of the caudal peduncle(Tail).
-
Make holes for the pectoral flippers.
-
Make a venting hole (e.g. blowhole).

-
Score/slip hole & pecs, then attach pecs to body.
-
add clay around pecs & inside body for extra reinforcement.
-
Lay on foam or anything that wont disturb the pec fins while it hardens a little.

-
Score/ slip both body halves.
-
Position the two together so that they can stick to each other.
-
Add clay to reinforce the two together.
-
Smooth out.

-
Paint using "slip"
-
Make sure you put 3 coats so that it's opaque with no brush streaks.

Here he is after the first firing!

-
Clean sculpture with a damp sponge before glazing.
-
Glaze (I used a transparent glaze)
-
Clean glaze off the area where the body meets stand at least 1/2 (so he can detach).
-
Make sure the glaze doesn't cover the vent hole.

And here he is after the second firing!
